← All Integration GuidesINTEGRATION GUIDE · API / PHP DEMOIntegrate Crypto Payments with the MochiPay API
Create and query payment orders from your application. PHP Demo 1.1.1 supports PHP 7.0–8.4 and provides order.php, callback.php, checkout.php with both presentation branches, bundled local dialog assets and an English README. Use on-site (default) or HPP with the same payment order.
Demo walkthrough · illustrative configuration · use a small real payment to verify your own setup.
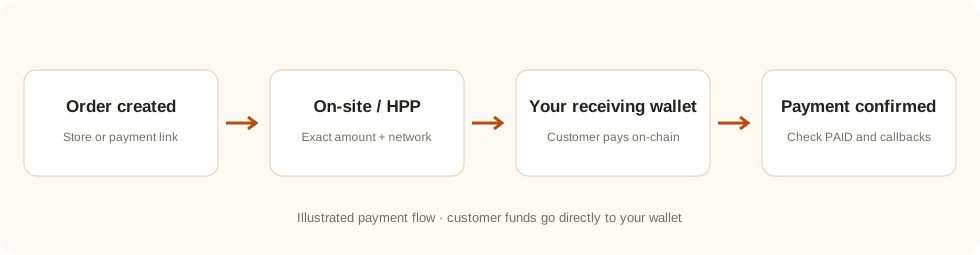 Payment-flow illustration. On-site and HPP use the same payment order; your server verifies its final status.
See the complete payment outcome
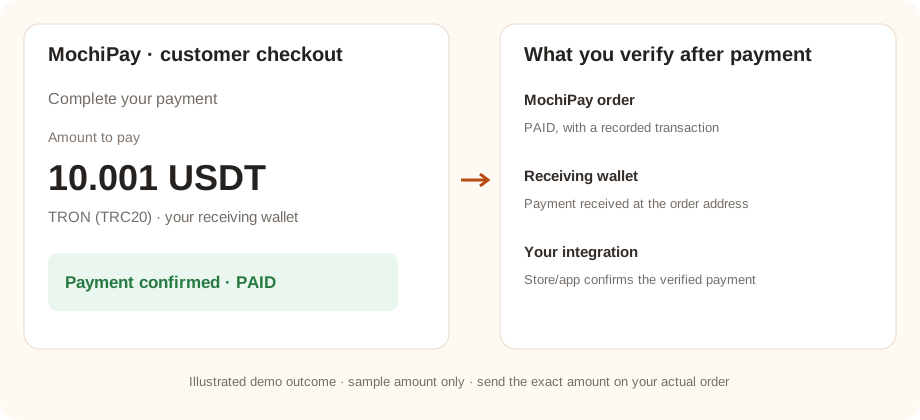
Demo illustration with sample values. Verify these outcomes using a real small payment in your own setup; the checkout amount and confirmation requirements depend on the order.
01 · Prepare your MochiPay account
- Create an account and activate a subscription.
- Open Wallets, choose Add HD Wallet → Generate New, securely back up the recovery phrase and save the wallet. Enable the asset/network you will use for the test.
- Set a recognizable customer-facing Display Name in Profile.
- Open API Credentials and copy your API key and saved API secret. If no secret is saved, regenerate it for first-time setup and store it securely. Regenerating an existing secret invalidates integrations that use the previous secret.
Ready when: your subscription and receiving wallet are active, and you have the credentials needed below.
See the illustrated account setup →Choose on-site or HPP
| Mode | Customer experience | Server responsibility |
|---|
| On-site (default) | Payment dialog on your own domain, with exact amount, address, network, QR and status. | Create and store the payment binding; query through your own backend and return only a safe payment view. |
|---|
| HPP | Redirect to the returned payment_url on MochiPay. | Store the same binding and verify callbacks/returns server-to-server. |
|---|
Checkout mode is your integration preference, not an API field. Both links use one order. Do not create another order when switching modes. Classic SaaS supports HPP only.
All five methods are available: USDT_TRC20, USDC_ERC20, BTC_BITCOIN, ETH_ERC20 and SOL_SOLANA. UP is the default unique amount direction; DOWN is also supported. Enable a receiving wallet for each offered method.
03 · Place and pay a test order
Open order.php. Create a small demo order using a unique merchant order reference and a configured payment method. Select ON_SITE or HPP; open the preferred link shown after creation. The result also offers Embedded store checkout and PHP HPP redirect links; both are implemented in checkout.php. The alternative link uses the same order.
- Match the selected asset/network. For a USDT_TRC20 test, have USDT and enough TRX for the sending wallet’s network fee. Other methods require the matching native network and any applicable fee asset.
- Send the exact amount on the payment page to the displayed receiving address. Do not round or reuse an address from a different order.
- Wait for the required blockchain confirmations and the MochiPay order to become
PAID.
The store/API example may price the product in USD. MochiPay locks the conversion when creating the order; unique amount adjustments can change the final payable amount. The checkout value is the amount to send.
Success check: the MochiPay order shows PAID, with the transaction recorded. Opening the browser return page alone does not prove payment.
04 · Verify the result and wallet receipt
Query the order by the system order_id from your application. Accept payment only after the authenticated query is PAID and matches your stored system ID, merchant reference, original amount/currency, selected asset/network, receiving address, exact payable amount and expected received amount. Fulfill through an atomic, idempotent local transaction. callback.php demonstrates this verification for notifications and browser returns, using private demo records. It does not fulfill orders; replace temporary records and the callback TODO with your production database and fulfillment transaction. Read the bundled README.
Match the payment transaction and receiving address with your MochiPay order. Review the receiving wallet or blockchain explorer. Funds are already in your receiving wallet; there is no platform withdrawal request.
To move funds, use a compatible wallet and allow for blockchain confirmations and native network fees. Read the receiving-wallet management guide →
Recovery and exact amounts
Persist the attempt before Create Order. After a timeout, query the same unique merchant reference instead of blindly posting another Create. Once known, query by order_id. Preserve decimal response values as strings before PHP or JavaScript float conversion; display pay_amount exactly. The bundled QR encodes the address only, so customers must enter the displayed amount.
When building your own API client
Use X-Mochi-Key and X-Mochi-Signature. Create Order signs the exact JSON body using Base64-encoded HMAC-SHA256. Query Order signs the exact query string without the leading question mark. Keep the signing secret server-side.
If the test does not complete
The payment option or order cannot be created
Check subscription status, an active receiving wallet, payment method code, credentials and the exchange-rate pair for the order currency. For plugins, also check the method is enabled for the store scope/customer used in the test.
The payment is still waiting or underpaid
Compare the asset, network, address and exact payable amount with the transaction. Wait for required confirmations. Do not mark a store order paid based only on a screenshot or browser return.
MochiPay is paid but my store/application is not updated
Check that notify/callback endpoints are publicly reachable over HTTPS and not blocked by authentication or a firewall. Confirm the integration can query MochiPay and inspect its error logs. Payment links alone update MochiPay, not an external store.